In this article, we will look at how to quickly and accurately create a new Dynamics 365 Plugin project using PAC CLI.
The easiest and fastest way for me to create a new Dynamics 365 solution is to use PAC CLI. PAC CLI provides us with a ready-made Plugin template, and it also quickly integrates the early bound generator into our project, allowing us to write our plugins without wasting any time.
Now let’s take a step-by-step look at how we can create a new project with PAC CLI. First, PAC CLI needs to be installed on our computer. There are multiple ways to do this;
What is Microsoft Power Platform CLI?
My suggestion is to install it with the .NET Tool, as the commands can be executed from anywhere.
Install Power Platform CLI with .NET Tool
Open Command Prompt or Powershell and run the command below.
dotnet tool install –global Microsoft.PowerApps.CLI.Tool
Note: To run this command, you need to have .NET installed on your computer (if you are developing a plugin, you must already have it at this point).
After installing dotnet, create a folder on your computer for your project, for example:
C:\Users\karacan\source\repos\furkankaracan\PAC_CLI_Project
Open a command line and access this directory.
cd C:\Users\karacan\source\repos\furkankaracan\PAC_CLI_Project
Now let’s create our new plugin project.
pac plugin init –skip-signing
You must use the –skip-signing parameter if you do not want to sign your plug-in assembly.
Let’s open the project with Visual Studio after the process is completed.

Early Bound Generator
Generating entity models for Dynamics 365 with PAC CLI is very easy. We can do this with just a single command line.
Before you begin:
- Connect to your environment using Power Platform CLI pac auth commands.
Use the following steps to get started:
- In your .NET project, add a NuGet package reference to either:
- For a client application: Microsoft.PowerPlatform.Dataverse.Client
- For a Dataverse plug-in project: Microsoft.CrmSdk.CoreAssemblies
- Create a folder called
Model. - In the
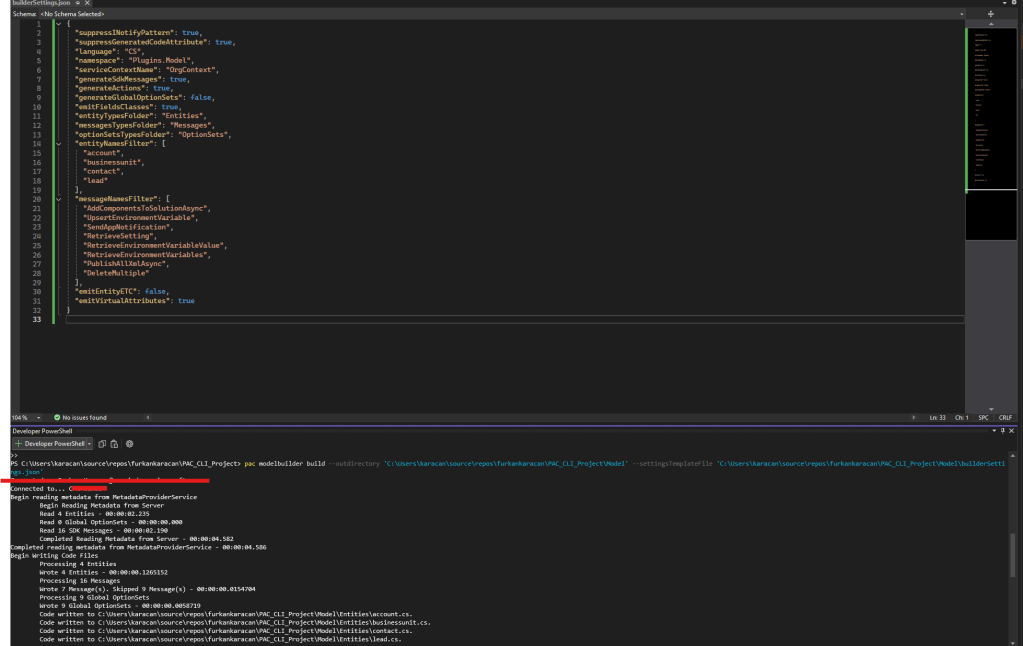
modelfolder, add abuilderSettings.jsonfile with the following settings:
- under entityNamesFilter add the tables you want to generate
- under messageNamesFilter add the Actions you want to generate
{
  "suppressINotifyPattern": true,
  "suppressGeneratedCodeAttribute": true,
  "language": "CS",
  "namespace": "Plugins.Model",
  "serviceContextName": "OrgContext",
  "generateSdkMessages": true,
  "generateActions": true,
  "generateGlobalOptionSets": false,
  "emitFieldsClasses": true,
  "entityTypesFolder": "Entities",
  "messagesTypesFolder": "Messages",
  "optionSetsTypesFolder": "OptionSets",
  "entityNamesFilter": [
    "account",
    "businessunit",
    "contact",
    "lead"
  ],
  "messageNamesFilter": [
    "AddComponentsToSolutionAsync",
    "UpsertEnvironmentVariable",
    "SendAppNotification",
    "RetrieveSetting",
    "RetrieveEnvironmentVariableValue",
    "RetrieveEnvironmentVariables",
    "PublishAllXmlAsync",
    "DeleteMultiple"
  ],
  "emitEntityETC": false,
  "emitVirtualAttributes": true
}
Below command can be used to generate early bound models for Power Platform.
pac modelbuilder build --outdirectory 'C:\Users\karacan\source\repos\furkankaracan\PAC_CLI_Project\Model' --settingsTemplateFile 'C:\Users\karacan\source\repos\furkankaracan\PAC_CLI_Project\Model\builderSettings.json'
Now that we have our models, let’s write the plugin and deploy it to Dynamics 365.
Deploying Plugin
Develop the plugin as you normally would. Once you’ve written the plugin, build it and open the folder for the version you wish to deploy, whether Debug or Release. There, we will register the .nupkg file using the plugin registration tool.
C:\Users\karacan\source\repos\furkankaracan\PAC_CLI_Project\bin\Debug
C:\Users\karacan\source\repos\furkankaracan\PAC_CLI_Project\bin\Release


I am opening PRT, I go to Register -> Register New Package and click on Import.

After importing, I locate my plugin Assembly inside the PRT and add my plugin step.
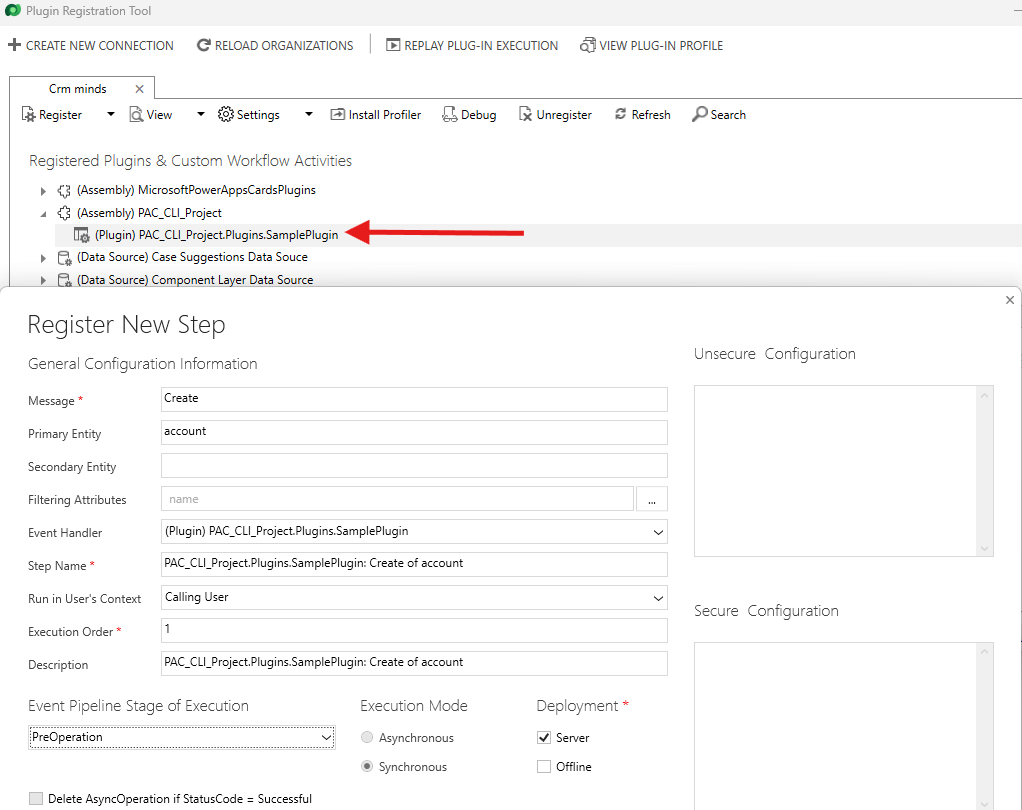
Here you go: That’s it 😉

Leave a comment