In this post I’m going to show you how to start and stop Azure-SSIS Integration Runtime on a schedule by using Web activity. This is a useful technique if you want to save costs and optimize the performance of your SSIS packages in Azure.
But first, let me explain what Azure-SSIS Integration Runtime is and why we need to configure a schedule for it. Azure-SSIS Integration Runtime (IR) is a specialized cluster of Azure virtual machines (VMs) that can run SSIS packages in Azure Data Factory (ADF) or Azure Synapse Pipelines. It supports both project deployment model and package deployment model, and it can access data sources in public or private networks. You can use familiar tools like SQL Server Data Tools (SSDT), SQL Server Management Studio (SSMS), or command-line utilities to deploy and run your packages in Azure.
So why do we need to configure a schedule for Azure-SSIS IR? Well, the answer is simple: to save costs and optimize performance. Azure-SSIS IR is billed by the hour based on the number and size of the VMs in the cluster. If you don’t need to run your packages all the time, you can save money by starting and stopping the IR on demand or on a schedule. For example, you can start the IR before your peak hours and stop it after your off-peak hours. This way, you only pay for what you use and avoid wasting resources.
Another benefit of configuring a schedule for Azure-SSIS IR is that you can ensure that your packages run on the latest version of the IR. Azure-SSIS IR is updated regularly with new features and bug fixes, but these updates are only applied when you start or restart the IR. If you keep your IR running for a long time, you may miss some important updates that could improve the performance or functionality of your packages. By starting and stopping the IR on a schedule, you can make sure that your packages always run on the most up-to-date version of the IR.
So how do we configure a schedule for Azure-SSIS IR? Well, there are different ways to do it, but one of the easiest and most flexible ways is to use Web activity in ADF or Synapse Pipelines. Web activity allows you to invoke REST APIs by using HTTP methods like GET, POST, PUT, or DELETE. You can use Web activity to call the ADF REST API or Synapse REST API to start or stop your Azure-SSIS IR programmatically.
Before I show you the steps, keep in mind that you can configure your pipelines in different ways.
- If you have only one pipeline, you can start and stop your IR in same pipeline.
- If you have more than 1 pipeline, its better to start your IR before your first pipeline and stop after your last pipeline. You need to set your triggers accordingly so your IR won’t stop while your other pipelines are still running!!
- You can have dedicated pipelines just for starting and stopping the IR.
I used the second option in my case. Now let’s skip to the steps.
- To make the pipelines more robust, you can ensure that the Web activities to start/stop your IR are retried if there are any transient errors due to network connectivity or other issues and only completed when your IR is actually started/stopped. To do so, you can use “Until” activity, which will contain two Web activities, one to start/stop your IR and another to check your IR status.
- For starting your pipeline follow these steps:
- In the Activities toolbox, in search box write Until and drag & drop onto pipeline designer.
- Let’s call the Until activity Start SSIS IR.
- On the Settings tab of Start SSIS IR Until activities, for Expression, enter
@equals('Started', activity('Get SSIS IR Status').output.properties.state)
- On the Settings tab of Start SSIS IR Until activities, for Expression, enter
- The Start SSIS IR Until activity contains Try Start SSIS IR and Get SSIS IR Status Web activities.
- In the Activities toolbox, expand General menu, and drag & drop a Web activity onto the pipeline designer. In General tab of the activity properties window, change the activity name to Try Start SSIS IR. Switch to Settings tab, and do the following actions:
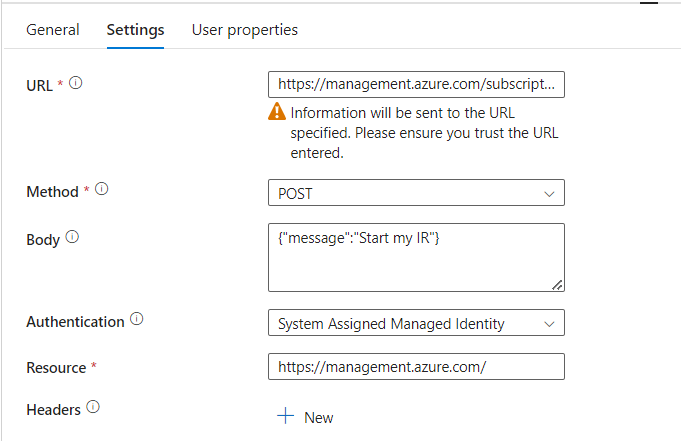
- For URL, enter the following URL for REST API that starts Azure-SSIS IR, replacing
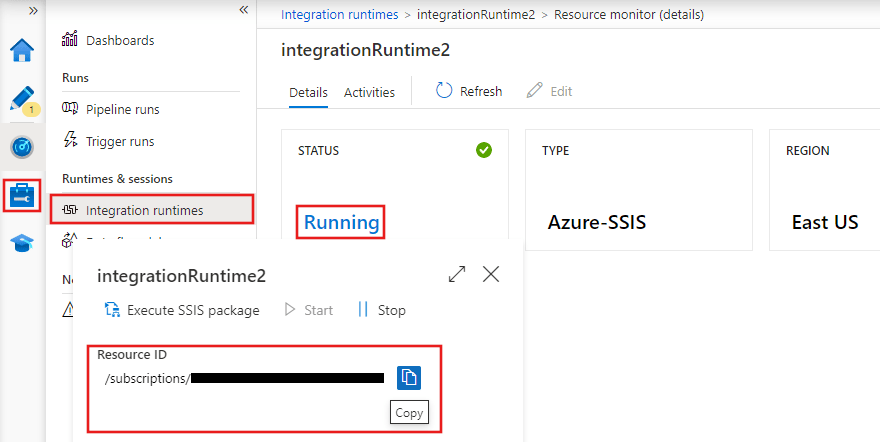
{subscriptionId},{resourceGroupName},{factoryName}, and{integrationRuntimeName}with the actual values for your IR:https://management.azure.com/subscriptions/{subscriptionId}/resourceGroups/{resourceGroupName}/providers/Microsoft.DataFactory/factories/{factoryName}/integrationRuntimes/{integrationRuntimeName}/start?api-version=2018-06-01. Alternatively, you can also copy & paste the resource ID of your IR from its monitoring page on ADF UI/app to replace the following part of the above URL:/subscriptions/{subscriptionId}/resourceGroups/{resourceGroupName}/providers/Microsoft.DataFactory/factories/{factoryName}/integrationRuntimes/{integrationRuntimeName}
- In the Activities toolbox, expand General menu, and drag & drop a Web activity onto the pipeline designer. In General tab of the activity properties window, change the activity name to Get SSIS IR Status. Switch to Settings tab, and do the following actions:

- For URL, enter the following URL for REST API that gets Azure-SSIS IR status, replacing
{subscriptionId},{resourceGroupName},{factoryName}, and{integrationRuntimeName}with the actual values for your IR:https://management.azure.com/subscriptions/{subscriptionId}/resourceGroups/{resourceGroupName}/providers/Microsoft.DataFactory/factories/{factoryName}/integrationRuntimes/{integrationRuntimeName}?api-version=2018-06-01. - Link 2 Web activities together.
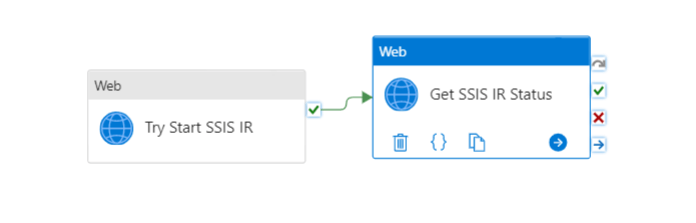
Finally, your first to executed pipeline will look like this:

- For stopping your pipeline follow these steps:
- In the Activities toolbox, in search box write Until and drag & drop onto pipeline designer.
- Let’s call the Until activity Stop SSIS IR.
- On the Settings tab of Stop SSIS IR Until activities, for Expression, enter
@equals('Stopped', activity('Get SSIS IR Status').output.properties.state)
- On the Settings tab of Stop SSIS IR Until activities, for Expression, enter
- The Stop SSIS IR Until activity contains Try S top SSIS IR and Get SSIS IR Status Web activities.
- In the Activities toolbox, expand General menu, and drag & drop a Web activity onto the pipeline designer. In General tab of the activity properties window, change the activity name to Try Stop SSIS IR. Switch to Settings tab, and do the following actions:

- For URL, enter the following URL for REST API that stops Azure-SSIS IR, replacing
{subscriptionId},{resourceGroupName},{factoryName}, and{integrationRuntimeName}with the actual values for your IR:https://management.azure.com/subscriptions/{subscriptionId}/resourceGroups/{resourceGroupName}/providers/Microsoft.DataFactory/factories/{factoryName}/integrationRuntimes/{integrationRuntimeName}/stop?api-version=2018-06-01. Alternatively, you can also copy & paste the resource ID of your IR from its monitoring page on ADF UI/app to replace the following part of the above URL:/subscriptions/{subscriptionId}/resourceGroups/{resourceGroupName}/providers/Microsoft.DataFactory/factories/{factoryName}/integrationRuntimes/{integrationRuntimeName}
- In the Activities toolbox, expand General menu, and drag & drop a Web activity onto the pipeline designer. In General tab of the activity properties window, change the activity name to Get SSIS IR Status. Switch to Settings tab, and do the following actions:
- For URL, enter the following URL for REST API that gets Azure-SSIS IR status, replacing
{subscriptionId},{resourceGroupName},{factoryName}, and{integrationRuntimeName}with the actual values for your IR:https://management.azure.com/subscriptions/{subscriptionId}/resourceGroups/{resourceGroupName}/providers/Microsoft.DataFactory/factories/{factoryName}/integrationRuntimes/{integrationRuntimeName}?api-version=2018-06-01. - Link 2 Web activities together.
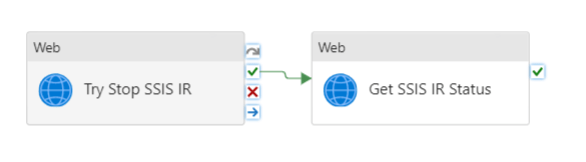
Finally, your first to executed pipeline will look like this:

That’s it for this tutorial on how to start and stop Azure-SSIS Integration Runtime on a schedule by using Web activity. I have explained how to create and schedule ADF pipelines that can control your Azure-SSIS IR, as well as how to execute SSIS packages on demand with minimal cost. You can use this technique to optimize your ETL workloads and save money on your Azure bill. If you have any questions or feedback, please leave a comment below. If you want to read the official microsoft documentation, you can click here. Thanks for reading and happy data engineering!

Leave a comment